
Welcome to the world of homemade bath bombs – a pretty popular way to add some fun and relaxation to your bath time.
These fizzy favorites are made with a blend of baking soda, citric acid, Epsom salt, and various colorants and fragrances, bubbling into action the moment they touch water.
Today, we’re focusing on how to make bath bombs without using food coloring. Many people prefer to avoid food coloring in their bath bombs to prevent skin irritation and tub stains. I have really sensitive skin and find some of the more colorful bath bombs like the ones from Lush can leave me a bit itchy.
So here we’ll show you how to use natural, safe alternatives that are just as effective and fun – without any itchyness! Let’s get started on making your bath time both enjoyable and safe for your skin!
Contents
- Why Avoid Food Coloring in Bath Bombs?
- Natural Bath Bombs: The Essential Ingredients
- Top Tips: Natural Colorants for Bath Bombs
- Choosing Oils for Fragrance and Skin Benefits
- Watch & Learn: How to Make Bath Bombs With Natural Colors & Ingredients
- Easy Step-by-Step Guide to Making Bath Bombs
- Some Customization Ideas
- Troubleshooting Common Issues
- Tips For Storage and Use
- The Last Pop!
- Our Research & Review Process
Why Avoid Food Coloring in Bath Bombs?
Food coloring is what can give home-made bath bombs that vibrant, eye-catching look. However, there are a couple of reasons why you might want to skip the food coloring when making these bubbly delights:
1. Skin Irritation
The primary concern with using food coloring in bath bombs is the potential for skin irritation.
Some people have sensitive skin that might react to the artificial dyes used in food coloring.
This can lead to redness, itching, or even rashes.
Expert insights
“While not everyone will experience a reaction, it’s always better to err on the side of caution, especially when it comes to products that will be in direct contact with your skin.”
Grace Harries-Wright, Cosmetologist/Dermatologist
2. Tub Staining
Another issue is the risk of staining your bathtub.
Food coloring, especially in its concentrated form, can leave behind a residue that might be tough to clean.
Depending on the material of your tub and the type of food coloring used, you could end up spending more time scrubbing your tub than relaxing in it!
If you’re worried about these concerns, it makes sense to look for natural alternatives that won’t irritate your skin or leave a mess behind.

Natural Bath Bombs: The Essential Ingredients
If you’re thinking of having a go at making your own natural bath bombs, here are the ingredients you’ll need:
- 1. Baking Soda (Sodium Bicarbonate): This is the base ingredient for bath bombs. Baking soda reacts with citric acid to create the fizzing effect when the bath bomb hits the water. It’s also great for the skin, providing a gentle cleanse.
- 2. Citric Acid: Citric acid is what gives bath bombs their characteristic fizz. When combined with baking soda and introduced to water, it creates a reaction that releases carbon dioxide gas, causing the fizzing action. Citric acid also helps to soften the bath water.
- 3. Epsom Salt (Magnesium Sulfate): Epsom salt is used for its health benefits. It’s known to help relax muscles and provide a soothing effect on the skin. It can also help to detoxify the body and soften the water.
- 4. Natural Colorants: Instead of food coloring, consider using natural colorants like oxides, micas, or plant-based dyes. These provide a range of colors without the risk of skin irritation or tub staining. Oxides and micas are minerals that offer rich pigmentation, while plant-based dyes can come from sources like beetroot powder, spirulina, or turmeric for more muted, natural hues.
Top Tips: Natural Colorants for Bath Bombs
- Beetroot Powder: Provides a lovely pink to red hue.
- Turmeric: Offers a bright yellow color.
- Spirulina or Chlorella Powder: Creates a vibrant green tone.
- Cocoa Powder: Gives a rich brown color.
- Hibiscus Powder: Results in a beautiful deep red or pink.
- Clay (like Pink Kaolin or Moroccan Red): Offers soft, earthy colors.
- Matcha Powder: Delivers a gentle green color.
- Paprika: Provides an orange to red shade.
- Activated Charcoal: For a deep black or gray hue.
- Alkanet Root Powder: Yields a purple or blue tint.
Choosing Oils for Fragrance and Skin Benefits
5. Coconut Oil: This oil is a favorite in bath bombs for its moisturizing properties. It helps to nourish and hydrate the skin, leaving it feeling soft and smooth.
6. Essential Oils: These are used for both their fragrance and therapeutic properties. You can choose from a wide range of essential oils depending on the desired effect.
For relaxation, lavender or chamomile are great choices. For a more invigorating bath bomb, consider peppermint or eucalyptus.
Remember, the key to a great bath bomb is not just the fizz, but also the beneficial properties it brings to your bath experience.
By choosing the right combination of these ingredients, you can create a bath bomb that’s not only fun and fizzy but also good for your skin and overall well-being.
Watch & Learn: How to Make Bath Bombs With Natural Colors & Ingredients
Here’s a great video tutorial that guides you through how make brightly colored bath bombs using only natural ingredients step by step!
Easy Step-by-Step Guide to Making Bath Bombs
Creating your own bath bombs at home is super fun. It’s a great way to add a personal touch to your bath routine. PLUS you know what’s going into them.
Here’s a step-by-step guide on how to make bath bombs. We’ll focus on getting the right texture for your mixture, how to mold them properly, and the importance of drying them correctly to avoid any cracks.
This guide is designed to make the process easy and enjoyable, even if you’re a beginner. Let’s get started!
Step #1 Mix Dry Ingredients

Combine 1 cup of baking soda, ½ cup of citric acid, ½ cup of Epsom salt, and ½ cup of cornstarch in a large bowl.
Ensure they are thoroughly mixed. If you’re using powdered natural colorants, add them at this stage.
Step #2 Combine Wet Ingredients

In a separate small bowl, mix together wet ingredients such as 2 tablespoons of coconut oil (melted), and about 10 drops of your chosen essential oil.
Step #3 Combine Wet and Dry

Slowly add the wet mixture to the dry ingredients, stirring continuously. The goal is to prevent the mixture from fizzing too soon.
The final mixture should have the consistency of damp sand – it should hold together when squeezed but not be wet or overly sticky.
Step #4 Mold the Bath Bombs
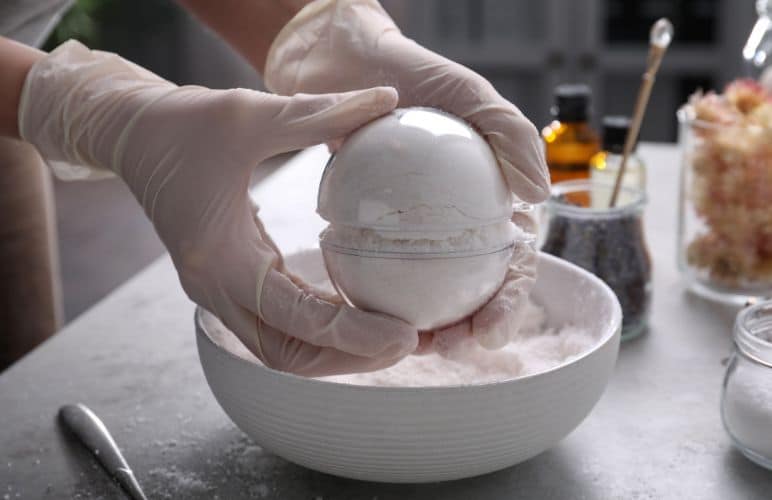
Fill each half of your bath bomb mold with the mixture. Press it down firmly and slightly overfill each half.
Press the two halves together tightly. Make sure there are no gaps or loose parts.
Step #5 Let Them Dry

Leave the bath bombs in the mold for a few hours before gently removing one side of the mold. Then, carefully remove the other side and place the bath bomb on a soft towel or a tray.
Allow them to dry out completely, ideally overnight or for 24 hours, to ensure they harden properly and don’t crumble or crack when used.
Step #6 Storage

Once dry, store your bath bombs in a cool, dry place, preferably in an airtight container to maintain their fizziness and aroma.
Some Customization Ideas
Here are a few ways you can make your bath bombs a bit more exciting and unique!
Mix in Some Fun:
- Toss in dried flowers like rose petals for a pretty look and a subtle scent.
- For a bit of sparkle, sprinkle in some eco-friendly glitter.
- Hide a tiny waterproof toy inside for kids – it’s like a little surprise as the bomb fizzes away.
Pick Your Favorite Scents:
- Lavender’s great for chilling out and helping with sleep.
- Peppermint’s your go-to for waking up your senses. Perfect for those groggy mornings or when you need a pick-me-up.
- Eucalyptus is awesome for when you’re feeling stuffy or just want to clear your head.
- Citrus scents, like orange or lemon, are like a burst of sunshine. They’re all about lifting your mood.
Play Around with Colors:
- Experiment with different natural colors to match your mood or the season. Beetroot powder makes a lovely pink, and spirulina gives a cool green hue.

Troubleshooting Common Issues
Making bath bombs is sometimes more art than science. It might take a few tries to get it perfect, but that’s all part of the fun! Keep experimenting, and you’ll soon find the perfect balance for your fizzy creations.
Here’s what can go wrong and how to deal with it for the perfect bath bomb:
The Mixture Is Too Wet
If your mixture feels too wet and starts fizzing, that’s a sign there’s too much liquid. To fix this, add a bit more of the dry ingredients – a little baking soda or cornstarch can balance it out. Remember, you’re aiming for a texture like damp sand, not wet dough.
The Bomb Is Not Forming Properly
If your bath bombs crumble or don’t hold their shape when you remove them from the mold, it might mean the mixture isn’t packed tightly enough.
Press down firmly when filling the mold. If the mixture is too dry and crumbly, add a tiny bit more of your wet ingredients – but just a few drops at a time.
There’s Cracking After Molding
If your bath bombs crack after taking them out of the mold, it could be due to drying too quickly.
Try covering them with a soft towel or cloth while they dry, or slow down the drying process in a less dry environment.
There’s A Lack of Fizz
If they aren’t fizzing up in the bath, it might be because there’s not enough citric acid, or the mixture got too wet during preparation.
Ensure you have the right balance of citric acid to baking soda (usually a 1:2 ratio), and be cautious with your liquid addition.
Tips For Storage and Use
Now that you’ve made your awesome bath bombs, let’s talk about keeping them fresh and getting the most out of them.
Storing Your Bath Bombs
Keep your new lovely bath bombs in a cool, dry place. Moisture is the enemy here – it can set off the fizzing reaction early and leave you with a ball of mush.
An airtight container is ideal. This keeps them dry and preserves their fizz.
If you’re into recycling, repurposed jars or tins work great for storage. Just make sure they’re dry and clean.
Using Your Bath Bombs
It’s easy! Just drop one into your bath water and watch the magic happen.
For the best experience, use your bath bomb within a couple of weeks. The fresher they are, the more they’ll fizz.
If you’ve added extras like flowers or glitter, a quick rinse of the tub after your bath might be needed to avoid any leftover bits.
Storing your bath bombs properly ensures they stay fizzy and fun for your bath time. And using them is as simple as can be – just drop one in and enjoy the show!
The Last Pop!
And there you have it – your very own homemade bath bombs, made without any food coloring!
By choosing natural ingredients and personal touches, you’ve created something that’s not just fun to watch fizz away, but also kind to your skin and the environment.
Whether you’re using them for a bit of self-care or as unique gifts for friends and family, these bath bombs are sure to be a hit.
Remember, the beauty of DIY projects like this is the room for creativity and the satisfaction of making something by hand.
Don’t worry if your first few tries aren’t perfect – it’s all part of the fun and learning process. Soak in the experience, literally, and enjoy those relaxing, fizzy baths. Happy bathing!
Discovered the perfect bath bomb for you? Tell us about it! Tag us on Instagram @heyfizzywizz or share your relaxing moments on our Facebook page. Join our community and exchange your favorite bath time rituals with fellow enthusiasts. Fancy making your own bath bombs? It’s easy! Check out our DIY Bath Bomb Recipes!

Our Research & Review Process
At Fizzy Wizz, we’re dedicated to ensuring that our recommendations for bath bombs are thorough, reliable, and genuinely useful. To achieve this, we’ve established a comprehensive research and review process.
We delve into the science behind bath bombs, citing evidence from cosmetic and dermatological studies. We gather real user reviews and seek unbiased insights from experts in skincare and aromatherapy, as well as from everyday bath bomb enthusiasts.
Our hands-on testing is at the core of our process. We personally try out a wide range of bath bombs, assessing them on various criteria such as scent intensity, skin compatibility, ingredient quality, and fizziness. We test these bath bombs in different water types and bathroom environments to ensure a well-rounded review.
This meticulous approach enables us to provide you with honest, insightful, and practical information about which bath bombs truly deliver on their promises.
Remember, everyone’s skin and preferences are different, so we always recommend patch testing new products if you have sensitive skin.

